How to Make a Paper Airplane
Learn how to make a classic paper airplane that flies smoothly with this simple step-by-step guide. Perfect for kids and beginners.

Materials
- 1 sheet of paper (A4 or Letter size)
- Flat surface to work on
Step-by-step Instructions
1. Prepare the Paper
 Start with a rectangular piece of paper. Place it in landscape orientation (horizontal).
2. First Fold
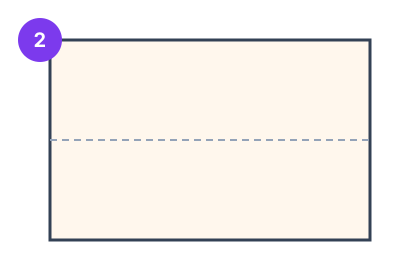 Fold the paper in half lengthwise. Crease well, then unfold. This creates a center line guide.
3. Fold Corners
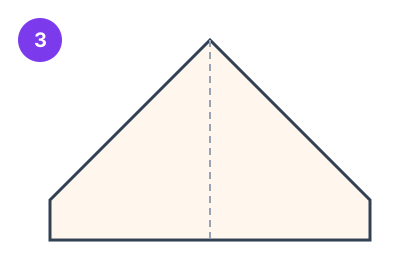 Fold the top right corner down to the center line. Repeat with the top left corner. The top of your paper should now form a triangle.
4. Form the Nose
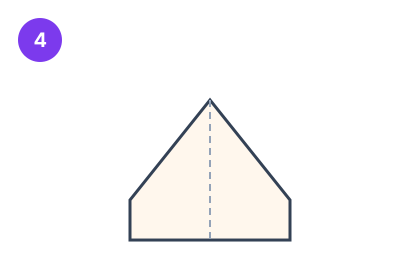 Fold the angled edges to the center line again, making a narrower shape. This forms the nose of the airplane.
5. Create the Wings
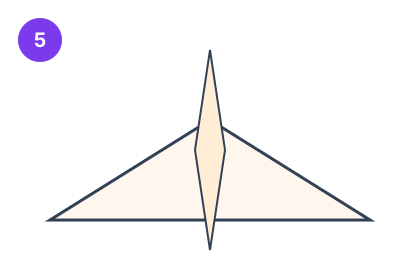 Fold the plane in half along the center crease. Then fold down the wings on both sides, leaving about 1 inch at the bottom for the fuselage.
Pro Tips
- Use thinner paper for better flight
- Fold sharply for straighter flight
- Adjust the wing angle to change flight direction
Related Crafts
How to Make a Paper Boat
Make a classic paper boat that actually floats! This easy step-by-step tutorial is perfect for kids and bath time fun.
How to Make a Paper Hat
Make a classic paper hat (newspaper hat) with this super easy tutorial. A fun craft for kids that takes only 2 minutes!
How to Make an Origami Heart
Make a beautiful origami heart with this easy tutorial. Perfect for Valentine's Day, cards, or decorations. Great for beginners.
Learn More About Paper
Best Origami Paper for Beginners
Choosing the best origami paper for beginners: compare kami, tant, washi, and foil by weight, size, and price to start folding with confidence.
What Paper to Use for Origami
Wondering what paper to use for origami? Match paper to your project type — simple folds, complex models, wet folding, and kids crafts — with practical picks.
Can You Use Printer Paper for Origami?
Plain printer paper works for origami, but it has trade offs. Learn when standard copy paper is fine and when to switch to proper origami paper.
Origami Paper Size: Why 15 cm Is the Standard
Most origami paper comes in 15 cm squares, with 7.5 cm for tiny models. Learn the common sizes, inch equivalents, and how to cut A4 into squares.